 Computer Help
USAF Retired/Spouse 

Short and simple, especially when you're trying to copy files from an external drive before it's destroyed or dies completely:
On the external drive, go to the user folder (Documents and Settings, or Users)
Right click on the My Documents sub folder (or even the actual {User} name folder
Go to:
Properties
Security (tab)
Advanced (button at the bottom)
Owner (tab)
Edit (button)
Change to Tracy(Laptop) or whatever your computers name is that has the external drive hooked to it
At the bottom on the left, put the check in the box for 'Replace owner and sub-containers and objects'
Click on Apply, Yes, OK, OK, OK
Open a command prompt (Run as Administrator) (you MUST do that part)
Type the following:
icacls "{driveletter}:\System Volume Information" /grant Administrator:f
where 'System Volume Information' will be the folder you want the access to and use the " marks.
To restore the permission, type the same link only use R instead of G.
TrustedInstaller has FULL CONTROL on your computer...not you. You can change the ownership to yourself, but when you're done making changes, it's best to put it back to TrustedInstalled to assist Window in stopping malware from installing/modifying your computer behind your back
Here's how you can let yourself have the full control rights over the folder you need:
Right click the folder you need to make adjustments to
choose Properties
Click on the Security tab
Click on Advanced
Click on Change Permissions
Click on Administrators in the list
Click on Edit
Click on Full Control in the bottom box in the Allow column
Click on OK all the way out.
You should now be able to change any file you want on your computer to do what you need
To return ownership back TrustedInstaller:
Right click the folder you had changed
choose Properties
Click on the Security tab
Click on Advanced
Click on Owner tab
click on Edit
type: NT Service\TrustedInstaller
Click Check Names to verify
click OK.
Select TrustedInstaller in the list
Put check in box for Replace owner on sub containers and objects box
Click on OK for all dialog boxes to close them
After trying every combination to get to the BIOS, it appears to be a battery issue. Here's the fix:
Remove the power cord, remove the battery.
Press and hold the power button to completely drain the power
Put the battery back in and plug in the laptop
the F2 key should now work to get to the BIOS
Decryption: If you want to disable Encryption of your drive, here's how
Settings > Privacy & Security > Device Encryption.
Change the top setting for Device Encryption to Off
BitLocker:
These are Not fully tested yet
Option 1:
Press the ESC key, then When the blue screen shows that you need to add the key, look at the bottom and take note of the first 8 characters of the bottom line where it states Recovery Key ID
In a browser, log into you Microsoft account
Go to My Microsoft Account
Go to Devices
In the list copy the key for that device that shows the same 8 characters as shown on the blue screen
Paste in the area for your key
Option 2
At the blue press ESC
At the bottom, click on Skip This Drive
Choose Command Prompt on the screen for Advanced Options
At C:\windows\system32 prompt, type: manage-bde -unlock C: -rp
Then type: manage-bde -protectors -disable C:
When the brightness slider is missing and not an option to add it to the Quick Actions in the notification area, here's the fix
Open Device Manager. Click on the + for Monitor.
Right click on the Generic PNP (or Integrated Monitor)and choose Enable, (or if that doesn't work, click on Disable, then right click again and choose Enable.
Open a command prompt
Type e:\ (where e is the drive letter of the external drive)
type: chkdsk /f
Choose Y to dismount the drive to run the chkdsk
Using Clipboard History lets you copy several segments of text, or PrintScreen shots or pictures, and store them for when you're ready to paste them in your documents.
(Note: copy does not work with PaintShop Pro when copying segments of a picture, but DOES work with IrfanView and MS Paint)
It's a LOT faster than: copy, go to document, paste, go back and copy more, then back to the document and paste....and keep going
Here's how to use it:
Settings > System > Clipboard > Turn it on
Now just copy all the text you want...one at a time
Go to you document, press Win+V and the clipboard history will pop up
Click on any of your history items and it'll paste
Win+V again and select your next item....just keep on going
Press Win+V at any time and click on Clear All at any time (so it doesn't fill up with un-needed clipboard clips
If there is something there you want to always keep, just click on the icon for 'Pin' and when you 'Clear All', all of the clipboard will clear EXCEPT your pinned item. Then you can click on that Pinned item icon again to unpin it if you no longer need to keep it.
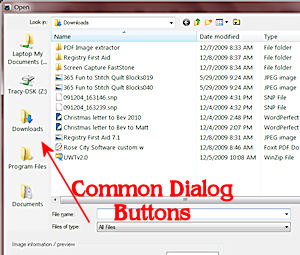
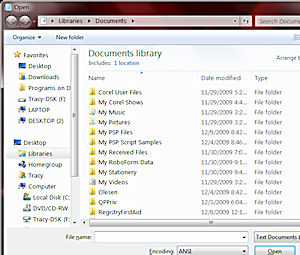
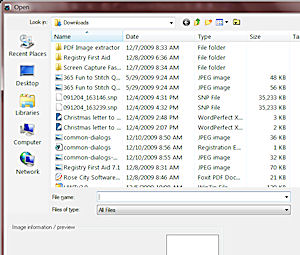
When opening a file, you may have icons on the left side of the dialog box. Some programs still have these. PaintShop Pro is one of them. The dialog boxes look similar to this:
You can make the changes manually in the registry
Open regedit and navigate your way to:
HKEY_CURRENT_USER\Software\Microsoft\Windows\CurrentVersion\Policies\comdlg32\PlacesBar (create the keys if necessary)
If they are there, then double click on any of the DWORD icons that you don't want and change the value to what you DO want...such as a specific folder, such as: C:\Graphics\CD\Landscapes
If you need to add them, create new DWORDS in the PlacesBar key
After you create the key, right click in a blank area and choose New, String and call it Place0. You can have 5 strings in there: Place0, Place1, Place2, Place3, and Place4.
To add a path to a specific folder, such as C:\Graphics\CD\Landscapes, double click on the Place# you want.
For the above sample you would double click on Place0, then type the path. " marks may be needed depending on the name of the folder
This key (the PlacesBar key) can be exported as a registry entry and imported when you have to reformat the computer or want to repeat the dialogs on another computer.
You don't NEED to have 5 placesbar locations. You can have less if you want
Changes will take affect right away...no need to reset the computer to see the changes.
These are 3 images showing what Windows has as a default, what Windows has with the Common Dialogs default, and my adjusted Common Dialogs example
This is done by using a program called Mouse Without Borders
Get the program at:
Mouse Without Borders (a.k.a. Microsoft Garage Mouse without Borders)
At the web site, choose your language then click on Download
Connect to the same network on both computers
Start the installation on the first (main) computer
Click on NO to generate a key and computer name
Leave that screen on
On the 2nd computer run the installation and click on YES
Enter the security code and the computer name EXACTLY as shown on the 1st computer (SharePoint-Win10 may be just SharePoint-Win1 as there is a 15 character maximum) and connect
Click on Done
Position the icons as to where the computers actually positioned to each other.
Click on Apply then Close
This will now work just like UltraMon and using 2 monitors where you mouse will move from the far right (which is your 1st computer, all the to the far left (which will be your 2nd computer. (hence the need for positioning the computer icons in previous step
Ever tried to copy text from a web page to paste it into an email address before (or most any program except NotePad). All the formatting seems to come with it. If you want to only copy the actual text, a great little program was passing on to me that is JUST GREAT.
Normally if you want to copy the text just for the words, you'd have to paste it into NotePad, then copy and paste it into whatever program you're working on (be it email, WordPerfect, MS Word, etc).
with this little gem, you copy the text from the page, click on the PerfectText icon in the systray, then just paste it into whatever program you're using.
Here's the site where you can get it.
PureText Copy (if the link doesn't work, please let me know)
Thanks CG for your WONDERFUL tip!
(These instruction come from Dell)
Computer diagnostics on Dell Laptop computers:
Press and hold the FN key, then power on. When you see the Diagnostic Boot.... release the FN key
This will do a diagnostic on your hard drive and search and fix any errors (bad sectors) it finds.
To move your Documents (Pictures, Videos, Music...etc) folder from the regular location on the C: drive to another folder (or another drive for safer keeping):
Right click on Documents at the top in a File Explorer and choose Properties and click on the Location tab.
With the Target box highlighted type in the new path for the other location (or 2nd hard drive) such as:
M:\Documents (just make sure that the M: drive is always connected)
When asked, choose Yes to Move the files
Your new folder will be:
M:\Documents
instead of
C:\Users\OWNER\Documents
Here's how to add an "Edit With" to the right clicking of a file
I use SharePoint Designer to modify my html documents. Default opening in with Chrome, Default Editing is with Notepad.
But...I want SharePoint Designer to be my Edit With, not Notepad
You need to add entries to the registry (see below also for PaintShop Pro)
It's easier just to copy the following registry lines into a Notepad document, then save it on your desktop as SharePoint.reg
(make sure you have Show File Extensions turned on in order to save it in .reg format instead of .txt format)
Once you save the file, run it.
Now when you right click on an .html or .htm file, you'll see the entry at the top for Edit with SharePoint Designer
HTM & HTML:
Windows Registry Editor Version 5.00
[HKEY_CLASSES_ROOT\SystemFileAssociations\.htm\shell]
[HKEY_CLASSES_ROOT\SystemFileAssociations\.htm\shell\EditWithSPDESIGN]
@="&Edit with SharePoint Designer"
[HKEY_CLASSES_ROOT\SystemFileAssociations\.htm\shell\EditWithSPDESIGN\command]
@="C:\\PROGRA~2\\MICROS~2\\Office12\\SPDESIGN.EXE /dde"
[HKEY_CLASSES_ROOT\SystemFileAssociations\.htm\shell\EditWithSPDESIGN\ddeexec]
@="[Open(\"%1\")]"
[HKEY_CLASSES_ROOT\SystemFileAssociations\.htm\shell\EditWithSPDESIGN\ddeexec\application]
@="spdesign"
[HKEY_CLASSES_ROOT\SystemFileAssociations\.htm\shell\EditWithSPDESIGN\ddeexec\topic]
@="system"
[HKEY_CLASSES_ROOT\SystemFileAssociations\.html\shell]
[HKEY_CLASSES_ROOT\SystemFileAssociations\.html\shell\EditWithSPDESIGN]
@="&Edit with SharePoint Designer"
[HKEY_CLASSES_ROOT\SystemFileAssociations\.html\shell\EditWithSPDESIGN\command]
@="C:\\PROGRA~2\\MICROS~2\\Office12\\SPDESIGN.EXE /dde"
[HKEY_CLASSES_ROOT\SystemFileAssociations\.html\shell\EditWithSPDESIGN\ddeexec]
@="[Open(\"%1\")]"
[HKEY_CLASSES_ROOT\SystemFileAssociations\.html\shell\EditWithSPDESIGN\ddeexec\application]
@="spdesign"
[HKEY_CLASSES_ROOT\SystemFileAssociations\.html\shell\EditWithSPDESIGN\ddeexec\topic]
@="system"
and for PaintShop Pro with .jpg, .jpeg, .png and .bmp files:
Windows Registry Editor Version 5.00
[HKEY_CLASSES_ROOT\SystemFileAssociations\.jpg\shell]
[HKEY_CLASSES_ROOT\SystemFileAssociations\.jpg\shell\EditWithCorel PaintShop Pro]
@="&Edit with PaintShop Pro"
[HKEY_CLASSES_ROOT\SystemFileAssociations\.jpg\shell\EditWithCorel PaintShop Pro\command]
@="C:\\Program Files\\Corel\\Corel PaintShop Pro X7 (64-bit)\\Corel PaintShop Pro.exe %1"
[HKEY_CLASSES_ROOT\SystemFileAssociations\.jpg\shell\EditWithCorel PaintShop Pro\ddeexec]
@="[Open(\"%1\")]"
[HKEY_CLASSES_ROOT\SystemFileAssociations\.jpg\shell\EditWithCorel PaintShop Pro\ddeexec\application]
@="Corel PaintShop Pro"
[HKEY_CLASSES_ROOT\SystemFileAssociations\.jpg\shell\EditWithCorel PaintShop Pro\ddeexec\topic]
@="system"
[HKEY_CLASSES_ROOT\SystemFileAssociations\.jpeg\shell]
[HKEY_CLASSES_ROOT\SystemFileAssociations\.jpeg\shell\EditWithCorel PaintShop Pro]
@="&Edit with PaintShop Pro"
[HKEY_CLASSES_ROOT\SystemFileAssociations\.jpeg\shell\EditWithCorel PaintShop Pro\command]
@="C:\\Program Files\\Corel\\Corel PaintShop Pro X7 (64-bit)\\Corel PaintShop Pro.exe %1"
[HKEY_CLASSES_ROOT\SystemFileAssociations\.jpeg\shell\EditWithCorel PaintShop Pro\ddeexec]
@="[Open(\"%1\")]"
[HKEY_CLASSES_ROOT\SystemFileAssociations\.jpeg\shell\EditWithCorel PaintShop Pro\ddeexec\application]
@="Corel PaintShop Pro"
[HKEY_CLASSES_ROOT\SystemFileAssociations\.jpeg\shell\EditWithCorel PaintShop Pro\ddeexec\topic]
@="system"
[HKEY_CLASSES_ROOT\SystemFileAssociations\.gif\shell]
[HKEY_CLASSES_ROOT\SystemFileAssociations\.gif\shell\EditWithCorel PaintShop Pro]
@="&Edit with PaintShop Pro"
[HKEY_CLASSES_ROOT\SystemFileAssociations\.gif\shell\EditWithCorel PaintShop Pro\command]
@="C:\\Program Files\\Corel\\Corel PaintShop Pro X7 (64-bit)\\Corel PaintShop Pro.exe %1"
[HKEY_CLASSES_ROOT\SystemFileAssociations\.gif\shell\EditWithCorel PaintShop Pro\ddeexec]
@="[Open(\"%1\")]"
[HKEY_CLASSES_ROOT\SystemFileAssociations\.gif\shell\EditWithCorel PaintShop Pro\ddeexec\application]
@="Corel PaintShop Pro"
[HKEY_CLASSES_ROOT\SystemFileAssociations\.gif\shell\EditWithCorel PaintShop Pro\ddeexec\topic]
@="system"
[HKEY_CLASSES_ROOT\SystemFileAssociations\.bmp\shell]
[HKEY_CLASSES_ROOT\SystemFileAssociations\.bmp\shell\EditWithCorel PaintShop Pro]
@="&Edit with PaintShop Pro"
[HKEY_CLASSES_ROOT\SystemFileAssociations\.bmp\shell\EditWithCorel PaintShop Pro\command]
@="C:\\Program Files\\Corel\\Corel PaintShop Pro X7 (64-bit)\\Corel PaintShop Pro.exe %1"
[HKEY_CLASSES_ROOT\SystemFileAssociations\.bmp\shell\EditWithCorel PaintShop Pro\ddeexec]
@="[Open(\"%1\")]"
[HKEY_CLASSES_ROOT\SystemFileAssociations\.bmp\shell\EditWithCorel PaintShop Pro\ddeexec\application]
@="Corel PaintShop Pro"
[HKEY_CLASSES_ROOT\SystemFileAssociations\.bmp\shell\EditWithCorel PaintShop Pro\ddeexec\topic]
@="system"
[HKEY_CLASSES_ROOT\SystemFileAssociations\.png\shell]
[HKEY_CLASSES_ROOT\SystemFileAssociations\.png\shell\EditWithCorel PaintShop Pro]
@="&Edit with PaintShop Pro"
[HKEY_CLASSES_ROOT\SystemFileAssociations\.png\shell\EditWithCorel PaintShop Pro\command]
@="C:\\Program Files\\Corel\\Corel PaintShop Pro X7 (64-bit)\\Corel PaintShop Pro.exe %1
[HKEY_CLASSES_ROOT\SystemFileAssociations\.png\shell\EditWithCorel PaintShop Pro\ddeexec]
@="[Open(\"%1\")]"
[HKEY_CLASSES_ROOT\SystemFileAssociations\.png\shell\EditWithCorel PaintShop Pro\ddeexec\application]
@="Corel PaintShop Pro"
[HKEY_CLASSES_ROOT\SystemFileAssociations\.png\shell\EditWithCorel PaintShop Pro\ddeexec\topic]
@="system"
When all else fails, use the Emergency Restart to reboot the computer
Press Ctrl+Alt+Del, then hold down the Ctrl key and click on the power button at the bottom right corner of the screen.
This is how to restore a computer to what it was when it was first turned on (out of the factory, assuming that it never had a clean installation).
Settings > Windows Update > Advanced Options > Recovery > Reset This PC
Click on Remove Everything > Choose Local from this device > Next > Click on Reset
This will take a long time.
When it's complete, it will start the computer as if you just turned it on for the very first time.
File History using the same internal drive:
Move from old computer to new computer:
Do a "run" on File History
Turn Off File History
Insert SSD Media card (best option), or flash drive, that will always remain inserted
Both locations should be connected now
Click on Select Drive
Select your new drive (the SSD Media Card) and click on OK
When asked, choose YES to move the history
If you had the FileHistory on the local drive, rename the old folder to FileHistory-OLD (just add the word OLD to the old hard drive location)
Verify the new location by changing a file, then checking the new location the next day.
Initial Setup:
To use your internal C:\ drive, first you need to create a folder on your drive such as C:\z_FileHistory
Next to get any folders OTHER than Documents, Music, Pictures, Favorites, Contacts, for FileHistory you need to first do the following:
1) Desktop: Right click on the folder for Desktop and choose More Options, click on Include in Library / Create New Library
2) Downloads: Right click on the folder for Downloads and choose More Options, click on Include in Library / Create New Library
3) Repeat for any other folder you want used in FileHistory
Right click on the z_FileHistory folder and choose Properties
Then click on the Sharing tab
Click on Share... I added "Everyone" and changed to Read/Write
Then click on Share again
** Take note as to the path (such as \\WORKTOP\z_FileHistory)
Click on Done, then close
Go to Control Panel > System & Security > File History
On the left, click on Select Drive, then click on Add Network Location
In the top address bar, click the UP arrow all the way to the top
In that top address bar, type in the path you noted (\\WORKTOP\z_FileHistory)
Press {enter}, then click on Select Folder
Click on OK
Base FileHistory folders are folders that are from your "Libraries"
Click on Exclude Folders, then Add. Select the Camera Roll, then choose Select Folder.
Repeat for Contacts, Favorites, Links, Saved Games, Searches, Camera Roll, Saved Pictures, Music, Videos & OneDrive, and/or other folders you don't want used for FileHistory based on the "Libraries" (see the C:\Users\NAME\ folder
To remove the usless folder (like Contacts, Saved Games, Favorites, etc.) you need to manually go to the User folder and select them
Click on Save Changes
Click on Advanced Settings
Change the "Save copy of files" to Every 3 Hours (for my working computer) or Daily for my personal computer)
Change "Keep saved version" to Forever (for my working computer) or 1 year (for my personal computer)
Click on Save Changes
Click on the button for Turn On. FileHistory will start
Close the control panel file history dialog box
This will take a long time, depending on how many folders you have set. 250GB took me about 2 hours.
Shortcut icon to desktop: To get to your File History to restore quickly, open a file explorer and navigate to: C:\Windows\System32\FileHistory.exe
Right click and drag to the desktop and choose Create Shortcut Here
To view the log of any problems, go to Control Panel / File History / Advanced Settings.
At the bottom is the link to view the event log for the backup.
You MAY find a folder gets put in there called $OF and have many folders & files in them.
This is most likely due to the length of the file path and name.
LEAVE THE $OF folders & file alone. If you need to restore a file the system MAY have to look there to find it.
To RESTORE a file from a previous version, follow these steps:
Control Panel / File History / Restore Personal Files
Using the left & right arrows, go to the date you want to recover the file(s) from
Click on the file you want to restore, then click on the 'Restore' icon (probably the big green circle icon between the left & right arrows)
You can Replace, Skip or Compare the files
To make your programs open full screen, right click on the shortcut to open a program. On the Shortcut tab, change the Run box from Normal to Maximized.
For some programs, that may not work...and in those cases, open the program, resize the window manually by using the corners to drag the size bigger. Clicking on the middle button to maximize it won't keep the settings....use the corners to make it big. Then close the window and open it again.
On a Dell Laptop, convert the Function Key back to F-Key (instead of the Media keys)
Easy: Press Fn+Esc
That's it. No restart needed.
To remove the Gallery from the top of the File Explorer (right below the Home link in File Explorer)
Open regedit and navigate your way to:
HKLM\SOFTWARE\Microsoft\Windows\CurrentVersion\Explorer\Desktop\NameSpace_41040327\
Delete the sub key of {e88865ea-0e1c-4e20-9aa6-edcd0212c87c}
Close file explorer and reopen
Choose your own combination of Hotkey to start a program. Something such as starting MS Word with the hot keys of Ctrl+2.
Right click on the icon in the Start menu and click on Properties.
Click inside the Shortcut Key field (where it will probably say 'None'. Press your combination of keys. In the example above, I would press Ctrl+2. That's it.
Note: if it doesn't work, Windows won't tell you why but, you'll have to change the combination. Windows won't accept one you've already assigned or likely to be used elsewhere.
This tip is here more for my convenience when my laptop has troubles
To fix the keyboard:
Turn off the computer, unplug the power cord, remove battery
Press the power button for 20 seconds
Replace battery, plug in power cord, turn on computer.
To Create a Local Account on Windows 11 After Installation
This works for both Home and Pro users. To enter the Settings app in Windows 11, press the ‘Windows + I’ keyboard shortcut. Go to the left sidebar and select ‘Accounts’, then ‘Family and other users’ in the right pane. Now find the ‘Add account’ button under ‘other users’ and click on it. To create a local account, select ‘I don’t have this person’s sign-in information’ from the pop-up that appears.
After that, click on ‘Add a user without a Microsoft account’. Once you enter a name and password, you are done creating a new local account, to which you can easily shift to from the start menu.
Yes, you CAN switch from a Microsoft account on your computer to a local account...and here's how:
(I found this from ZDNet.com)
Go to Settings > Accounts. On the left side, click on 'Your Info'.
Click 'Sign in with a local account instead'.
Enter your password for your Microsoft account, and then click Next.
On the next page (Switch To A Local Account page), type in your new user name and password, (if you still want one, or leave it blank if you don't want one)
Now click on Next so it will sign you out from your Microsoft account and sign in to your new local account.
Some of your desktop icons may not appear, but the programs are still there. You can put those on your desktop manually by finding the program in the Program Files folder or the Program Files (x86) folder.
Here are 4 different options:
Option 1:
Group Policy Editor (Windows Pro only)
Navigate your way to Computer Configuration > Administrative Tools > System > Power Management > Sleep Settings
Double click on 'Require a password when a computer wakes (plugged in) then click on Disabled, then on OK
Repeat for the entry called 'Require a password when a computer wakes (battery)
Option 2:
Go to Settings > Accounts > Sign-In Options
'Require Sign-in' set to Never
UNcheck the box for Make Your Device Passwordless
If you don't see that option, go to the next option
Option 3:
Open regedit and navigate your way to:
HKEY_LOCAL_MACHINE\SOFTWARE\Microsoft\Windows NT\CurrentVersion\PasswordLess\Device
and set the value to 0
If necessary, create the DWORD key and name it: DevicePasswordLessBuildVersion
and set the value to 0
Option 4:
When all else failed for me, this one worked
Open regedit and navigate your way to:
HKEY_LOCAL_MACHINE\SOFTWARE\Policies\Microsoft
On the left side right click on Windows > New > Key. Name it Power
Right click on Power and create New Key named PowerSettings
Right click on PowerSettings and create New Key and name it 0e796bdb-100d-47d6-a2d5-f7d2daa51f51
On the right side, right click and choose New DWORD called DCSettingIndex. Set the value to 0
Create another DWORD and name it ACSettingIndex. Set the value to 0
When you can talk faster than you can type...use the microphone in your laptop
The key combo is Win+H. That will turn it on.
Once on, you can set it so that anytime you open an program that is capable of typing text, the microphone icon will turn on.
When you see the microphone after you first press Win+H, there's a cog wheel Settings on it. Click on that then turn on Voice talking launcher
Then you click the microphone and just start talking.
This work with MS Word, WordPerfect, even Chrome when you start an email.
You can even talk a web site address. Just watch out for the . that is put at the end of the line. It thinks it's the end of a sentence and you have to remove the . mark
But that only happens if you turn on Automatic Punctuation.
Not all programs will accept voice-to-text....but most will.
If it gets in your way, just click on the 3 dots and turn it off. Just remember it's Win+H to turn it back on next time you want to use it.
When Settings shows your email address at the top left and you know you're not using an MS account, your computer is still linked to MS
Here's how to get it unhooked and shows Local Account instead in settings at the top left:
Settings > Accounts > Linked Devices
At the bottom of any device, click on Remove Device
A browser will open for you to log into the MS account
At the top right you'll see a link for Remove This Device (unlink from your account)
Click on that
Put check in the box for "I am ready to remove this device"
Click on Remove
THEN....
Settings > Accounts > Your Info
Click on "Stop signing in to all Microsoft apps automatically"
Minimize all windows except what you're looking at
CUTE feature here:
On the one window you want to keep up, grab the title bar and give it a shake back and forth a few times.
All windows will minimize except the one you're looking at
To activate Mouse Over to activate another window, you need to go to Ease Of Access:
Note: Going to All Settings does NOT have the box you need.
Go to: Control Panel > Ease of Access Center
Click on "Make the mouse easier to use"
Scroll down and put the check in the box for "Activate a window by hovering...."
You'll then need to slow it down by going to the next link tip for Mouse Slowed When Using Hover
Only if you're comfortable in the registry.
In Regedit navigate to:
HKEY_CURRENT_USER\Control Panel\Desktop
Rename your registry value:
From: ActiveWndTrackTimeout
To: ActiveWndTrkTimeout
Edit the key and change from Hexadecimal to Decimal
Set to 300 (1000 would be slower, 200 would be faster)
Log off, then sign in again.
Settings > Bluetooth & Devices
In the "Other Devices" section there may be several icons for different devices (such as Marks TV)
You can make them all go away by....
Go to Control Panel > Network & Internet > Network & Sharing Center > Media Streaming Options.
If it's not turned on, then turn it on
Highlight on the offending device (Mark's TV), then click on Remove > Remove
You will now have to go to Settings > Devices. Manually remove the entire list of offending items.
Restart the computer
User Folders
These procedures cannot be done on the Favorites listed on the left side, but any other folder can be shared by using explorer and navigating to the folders directly.
Navigate to the C:/Users/NAME folder.
Right click on the folder you want to share and choose Share With > Specific People.
Choose Everyone, then click on Add
Change the permission level to Read/Write or Full Control
Repeat for others that are in the list
Click on Share
Drive or Program Folder
To share an entire drive (such as a 2nd data drive where programs aren't installed)
Right click on the drive, Choose Sharing/advanced Sharing. Click on the Security tab
Click on Edit, then click on Add.
In the box type: Everyone
Click on Ok
Put check in boxes for Full control, then click on Apply
Click on OK to close all dialog boxes.
run: control userpasswords2
Remove the check in the box for Users must enter a user name and passwords
With the newest update, Notepad will automatically save whatever you are typing, when you close the program. Next time you open NotePad, that document (or tabs) will open so you can continue where you left off....YUK !!
You CAN turn it off so it doesn't automatically save
Open Notepad
On the right side, click on the Settings icon
On last item that states "When Notepad Starts", click on the drop down and choose "Open a New Window"
If you have the problem of your NumLock being set to on when you turn on the computer, go to Regedit and navigate your way to:
HKEY_CURRENT_USER\Control Panel\Keyboard
Double click on InitialKeyboardIndicators and change the value to 2
Reset the computer
To remove the OneDrive icon go into the registry and edit the following key:
HKEY_CLASSES_ROOT\CLSID\{018D5C66-4533-4307-9B53-224DE2ED1FE6}
Double click on: System.IsPinnedToNameSpaceTree
Change the value from 1 to a 0
Additional key to change (if needed)
HKEY_CLASSES_ROOT\WOW6432Node\CLSID\{018D5C66-4533-4307-9B53-224DE2ED1FE6}
If needed...you may need to do this also:
(Information found at support.office.com
Via Group Policy Editor, navigate your way to:
Local Computer Policy > Computer Configuration > Administrative Templates > Windows Components > OneDrive
Double click Prevent the usage of OneDrive for file storage.
Select Enabled, then click OK.
In the notification area, right click on OneDrive and click on Settings
On the General tab, Uncheck all the boxes
On the AutoSave tab, set the Documents and Pictures lists to This PC only, and uncheck the other boxes.
On the Account tab, click Choose folders.
In the Sync your OneDrive files to this PC box, Cick on Sync All Files, then click again to remove all the check marks.
Click OK to close the box and return to settings.
Click OK
Open the Settings box again: In the Notifications area, right-click the OneDrive icon, click Settings. On the Account tab, click Unlink OneDrive. Close the Welcome to OneDrive box that appears.
Open File Explorer, right-click OneDrive, and then click Properties.
On the General tab, next to Attributes, check the Hidden box. This hides OneDrive from File Explorer.
One more time, back in the Notifications area, right-click the OneDrive icon and click Exit. This removes the OneDrive icon from the Notifications area.
Some programs will let you tell your computer what directory you want to have accessed when you press Open, Save (like WordPerfect or MS Word.) Then again some don't (like MS Paint)
If your application doesn't offer this option, you can still do it.
Click on Start/All Programs, and go find the icon for the application you want. Right-click the Shortcut and select Properties.
Click on the Shortcut tab. In the 'Start In' field, type the desired directory you want the program to use everytime you start the program.
Need to have multiple programs to start at the same time?
I frequently use PaintShop Pro and Font Viewer at the same time. So...why start each program by clicking on the first icon, waiting for it to load, then clicking on the second.
You can have several programs start if you want also:
Say you want to always start WordPerfect and QuattroPro.
You can open the both in just one click.
Here's how:
Open Notepad
Copy and paste the following lines in red....then make the adjustments as needed for the programs you want
Since I have WordPerfect & QuattroPro starting, here's what mine looks like:
start "" "C:\Program Files\Corel\WordPerfect Office X7\Programs\qpw17.exe" "T:\Sewing\_Selling\_Files\Sales Sheet.qpw"
start "" "C:\Program Files\Corel\WordPerfect Office X7\Programs\wpwin17.exe" "T:\Sewing\_Selling\_Files\_Sales Receipts.wpd"
This starts both programs and a specific file with each program.
You can have more than 2 if you like
Now, click on File, Save As. At the bottom change the box for Save As Type to read All Files
In the box for File Name, type in a short description, such as "wp-qp.bat"
You MUST have the " marks and MUST have the .bat inside the quote marks.
Navigate your way to a safe folder such as C:\Users\Tracy. Click on Save.
Right click and drag the file to the desktop and choose Create Shortcut Here
Right click on that icon and choose Rename...give it a name such as QP & WP
Right click on that icon and choose Properties
Click on the button for Change Icon (you'll get a message about not finding icons, so just click on OK)
Find an appropriate icon you want to use and choose Ok twice to have your new icon showing.
Double click on your icon and if it doesn't work, you'll know it. Go back to the File Explorer, right click on your .bat File (the one you created with a new name), then choose Edit. Make adjustments where you find errors.
To clear your AutoComplete lists for web address, forms and user names and passwords, and even reset the prompt for saving passwords:
Go to Control Panel > Internet Options.
Click on the Content tab, then click on the button called Auto Complete...
Here you can click on Clear Forms and Clear Passwords and put the check back in the box for Prompt me to save passwords.
To clear the web addresses, click on OK, then click on the General tab and click on the button for Clear History (about 1/2 way down)
If the computer powers on upon just opening the lid (probably Toshiba computers), you need to do a power management in the BIOS
Go into the BIOS, then Power Management
Change the "Panel Open Power On" from 'Enabled' to 'Disabled'
Make the change in Settings:
Settings > Accessibility > Keyboard
Click on Keyboard Device (under Related Settings)
Scroll down and turn off "Use the Print screen key to open screen capture"
Open the Snipping Tool app, click on the Settings icon
In the section for Snipping, turn off Automatically save original screenshots.
Win+R and type: services.msc
In the Services window, scroll down to Print Spooler and Stop the service. (then leave this window open)
Open file explorer and navigate to C:\Windows\System32\Spool\Printers
Select all files in that folder and delete them all.
Return to the Services window, and Start the print spooler.
Your print queue should now be empty.
Some versions of windows always give you the 'delete confirmation dialog' box, others do not.
If you want and don't have it, right click on the recycle bin and put the check in the box for "Display delete confirmation dialog"
If you have it and DON'T want it, then do the same procedure and UNcheck the box
When getting the error that the F:\ Recycle Bin is corrupted. Do you want to empty the recycle bin...then you get an error that you can't because you're denied access. Here's the fix:
Open a command prompt with Administrator Privileges
type ../ until you get to the C:\ only
type this: rd /s /q F:\$Recycle.bin
(that's a lower case Q, not a g)
If you find that when you're computer is having troubles, and the computer just restarts on it's own...it might be driving you crazy.
What if you haven't saved something and the computer has troubles. It may just reset on it's own. Don't let it. Give yourSELF control over the restart.
Go to Settings > System > Advanced System Settings, then click on the Advanced tab
In the section for Startup & Recovery, click on Settings
UNcheck Automatically Restart
There are a LOT of choices when you right click and choose New. Such as: BMP Image, Journal, Rich Text Document..and a boat load more.
I've trimmed mine down to only what I would use...since I would never create a BMP image from a right-click, nor would I create a journal (ever). So I trimmed it down!
You need a program to force these adjustments to stick. You can get it Here at Source Force (open source program)
No installation is required....And it WORKS too !!
There are a few different ways to get to Safe Mode with Windows
Option 1:
Press Win+R and type msconfig
Click on the Boot tab and put the check in the box for Safe Mode / Minimal (or network if you need to have access to the internet while in safe mode)
Click OK and restart the computer
Option 2:
Press and hold the Shift key when you click on Restart
When it restarts, click on Trouble Shoot > Advanced Options > Startup Settings > Restart
Press F4 for Safe Mode
press F5 for Safe Mode with Command Prompt
Press F6 for Safe Mode with networking
Option 3:
If the computer will just not boot into windows, on the 3rd attempt Windows will display the Choose An Option dialog box where you click on Trouble Shoot. Then continue as in Option 2 above.
When doing customizing, you may lose the pop-up that says Safe To Remove Hardware after you chose Eject
The answer is in the notifications
All Settings > System > Notifications & Actions
In the section for Notifications make sure that "Get notifications from apps and other senders" is turn on.
You can turn off all of the items listed below that such as Audio, Print Notification, or others listed if you want.
Yes, you CAN have them. Even if you don't have the newest version of Windows .
If someone gives you a 3D screen saver, such as Euphoria from their computer (because they have the newest version), you will need to make adjustments.
Here's a trick that worked for me right from the git.
In the folder where the screensaver is located, rename the file. You will have to be able to see the file extension
Rename it from .scr to .sCr
Yes....change the c to a capital C
Funny...but it worked for me right away.
If that doesn't work, you'll have to download 2 files: GLU32.DLL and OPENGL32.DLL. and place them in the C:\Windows\System32 directory.
You can obtain the files from http://www.dll-files.com. CAUTION: there are plenty of popup ads that will drive you nuts.
In order to copy the files, you first have to "take ownership" of the files that are already in there. Take ownership then copy the files to a safe location.
Then copy the downloaded .dll files into that folder.
If neither of those tricks work, your graphics card probably doesn't support OpenGL
And this is where you can get those really smooth slick screen savers: http://www.reallyslick.com/. Euphoria is my favorite ;)
Windows 11:
Settings > Accessibility > Visual Effects > Turn on Always Show for scroll bars
Open regedit and navigate to the key:
HKEY_CURRENT_USER\Control Panel\Desktop\WindowMetrics
Change the value for ScrollWidth from -255 to about -350 for a comfortable width of scrollbar
I don't know about you, but when I use Search, I want ALL of the computer searched...not just certain areas.
I've found a great program that puts your "Searching" back to full computer searching mode
It's called AgentRansack
You can get it at:
AgentRansack
If you really like it and want to use it all the time (like me), then you can have it on your start menu...right at the beginning
Place a shortcut on your desktop or start menu in a nice convenient location
To stop the Search feature from searching the internet and showing the results with Bing in MS Edge:
Open Regedit and vavigate to:
HKEY_CURRENT_USER\Software\Policies\Microsoft\Windows\Explorer
Right-click the empty space in the right panel, and select New > DWORD (32-bit) Value
Name the value: DisableSearchBoxSuggestions
Set the Value data to 1
Close Regedit
Open Task Manager, Find the application called "Windows Explorer", then click Restart.
Now when you do a search, it's looking at your computer, not the internet with Bing.
You can have a one icon shutdown right on your desktop to shut down windows instead of going to Start, Shutdown, Shutdown, OK. Here's how:
For a Shutdown button
Right click on a blank area on the desktop
Click on New, then Shortcut
Type this: shutdown -s -t 00
(those are zero's not the letter)
Click Next, then give it a name, such as Shutdown, then click on Finish
For a Restart button
Do the same thing only type: shutdown -r -t 00
Then give it the name Reset
Now...those icons look ugly...change them too
Right click on the first icon you just created, click on Properties, click on Change Icon (you'll probably get a message...just click on OK), then find a different icon to use and double click on it. Then click on OK. Then change the other icon (if you create 2 of them)
This problem happens when Windows does an update to HP computers (and maybe other computer makers as well).
Here's the fix:
Open Device Manager (Without ClassicShell, open an explorer, right click on This PC, choose Manage, then Device Manager
Open Sound, Game & Video Controllers
Right click on IDT High Definition Audio CODEC, choose Update Driver
Click on Browse My Computer
Click on 'Let me pick from a list of devices'
Click on High Definition Audio Device. (DO NOT click on any of the CODEC's listed)
Click on Next, and choose YES when Windows tells you it's not recommended. (tuff...we're gonna use it anyway)
Ever find that you need that special character like those? Or maybe special foreign characters?
Windows has had (for YEARS) a program that can help you out
It's called Character Map
You can find in your start menu
Click on Start, then start typing Character.....you'll see it pop up. But DON'T click on it. Instead, right click on the app icon and choose Pin To Start
No you can just click on Start, then click on Character Map
Now find the character you want. You can change the font to see if the font you want to use is capable of doing that character.
You may have to use your arrow keys to navigate to the one you want to highlight it.
Then click on Select, then click on Copy.
Now go to the program where you're typing and press ctrl+v and you're character will pop in there for you.
To keep a full life span of an SSD, follow these guidelines
Some programs need to be manually put in the startup folder, yet the startup folder is missing in Windows, sort of. It's there, you just have to dig to get to it.
It can still be found at:
C:\Users\name\AppData\Roaming\Microsoft\Windows\Start Menu\Programs\Startup
Here's how to add folders to the Windows Start Menu, or add more rows
To Add Rows
Click on Start, then at the top click on Show All
Go to Settings > Personalization > Start
Turn off Show Recommendations..., and Show Account Related....
To Make Folders
All you have to do is drag one icon onto another
Drag PaintShop Pro onto the icon for I_View, then drag IconWorkShop onto it.
Drag Quattro Pro onto WordPerfect, then drag Presentations onto it.
When the Phone Link flyout shows up on the Start menu, it's time to shut it down. Here's how:
Option A) Start with the Phone Link App. Open the app. Go to Settings, My Devices. Select the device and choose Unlink or Remove (or More Options, then Remove.
Option B) If it's not connected anyway, go to Settings > Personalizaiton > Start
At the bottom turn off "Show mobile device in Start"
Or you might be able to right click on the flyout and choose Unpin from Start
Ok....you've had enough of the error reporting stuff. You know...every time a program shuts down and Windows wants to send the error report to Microsoft.
Here's how you stop it from coming back over and over again.
Windows Pro
Go to Group Policy Editor and change the Windows Error Reporting Service item to stop the service and change to Manual
Windows Home
You have to edit the registry
Navigate to HKEY_LOCAL_MACHINE\SOFTWARE\Microsoft\Windows\Windows Error Reporting
If the key isn't there, you'll have to create it.
Then create a new DWORD and name the key disabled and give it the value of 1
Found at Microsoft's web site, here's the link to fix the problem when the partition is full and can't do updates:
SRP Fix
Note: This assumes you have an MBR and not a GPT. Tested by me and it worked. If you have GPT, see end of this section for the procedures
Right click on This PC > Manage > Disk Management
Right click on the partition called System Reserve > Change Drive Letter and Paths > Add.
Choose Y for the drive letter, then click on OK
Start Command Prompt and Run as Administrator
In the cmd window type all the following:
Type Y: <enter>
Type cd Boot\Fonts <enter>
Take ownership:
Type takeown /d y /r /f . (include the space period at the end of that line)
Backup permissions:
Type: icacls Y:\* /save %systemdrive%\NTFSp.txt /c /t
Make sure that all files are showed as successful and none as failed. However, failure of the System Volume Information is ok
Type whoami <enter> and take note of the user name
Take permission:
Type icacls . /grant user:F /t where user is the user name noted in previous set
In the cmd window, ensure you are still in the fonts location of (Y:\Boot\Fonts)
Type del *.* (yep...that's right. Your only deleting all the fonts in that folder)
Type Y to confirm and continue
Restore permissions back to the system:
Type icacls Y:\ /restore %systemdrive%\NTFSp.txt /c /t <enter>
Some failed files will happen and its ok. If the amount of successful files is None, then the command was executed incorrectly, repeat the above step as some of the files MUST be successful before continuing.
Return Access Control List back to System:
Type icacls . /grant system:f /t
Restore ownership:
type icacls Y: /setowner “SYSTEM” /t /c <enter>
Go back to Disk Management. Take note the size of the SRP. Then Refresh the data to confirm if the SRP now has a larger free space. If space has increased, remove the drive letter:
Right click the System Reserved Partition > Change Drive Letter and Paths
Select the Y: drive, then select Remove > OK.
If you have a GPT partition instead of MBR, the procedures are short: (untested by me personally)
Start Command Prompt and Run as Administrator
At the command prompt, type mountvol y: /s <enter>
Type Y: <enter>
Type cd EFI\Microsoft\Boot\Fonts
Type del *.* to delete font files. Type Y, then press <enter> to confirm
To restore the completely, 100%, including personal file, appdata, Windows, Settings....everything, use Point-in-Time instead of System Restore. Here's how:
If you're in windows already, go to Settings > System > Recovery > Advanced startup and click on Restart Now, then click on Restart Now again
If you can't get into windows, then do the following to get there:
Once in Advanced Options click on Troubleshoot > Point In Time Restore
Choose the available point you want to use.
Click on Continue, then click on Restore.
To restore a Toshiba computer to factory specs, a well hidden trick:
Press the number 0 upon restarting the computer and you'll find your way. You may need to click on Advanced to get to the destructive restoration that will complete turn back your computer.
If you click on the folder called System Volume Information, you'll get a notice that you can't view it. Well, you CAN, if you want.
The folder is used by the System Restore Tool to store information and restore points.
Here's how to view it (and delete it if you choose)
Go to Start, Run and type: cmd
Go to the root folder of the drive you want, such as G:
The type this:
cacls "G:\System Volume Information" /E /G username:F
and press enter
You can now see what's inside and even delete the folder from your 2nd drive if you choose.
To get rid of the all white title bars, you need to make a minor change
Go to Settings > Personalize > Colors
Below the color swatches, turn on for the first one: 'Show Accent Colors on Title Bars & Window Borders'
Start & Taskbar can only be changed if using Dark mode.
To stop the Tap To Click on a laptop touchpad, you need to go to:
Settings > Bluetooth & Devices > Touchpad > Taps
Uncheck the top 3 boxes in the section for 'Taps'
Right Click button of the touchpad stopped working? No problem, you can get it back.
Settings > Bluetooth & Devices > Touchpad > Taps
Put the check back in the box for 'Press the lower right corner of the touchpad to right click'
Force Windows to bypass the UAC and just open the darned thing
This takes what’s called a Scheduled Task, and you do not need a password to create it.
Click on Start, type 'Task Scheduler' in the search bar, then click on Task Scheduler
On the left side, click on Task Scheduler Library
On the right side, click on 'Create Task...'
Give your task a name in the top box (such as Regedit)
Put a check in the box for Run With Highest Privileges
Choose Configure for: Windows 10
Click on the Actions tab at the top
Click on New
The top drop-down bar should be Start Program
Click on Browse
Locate the program you want to start and double click on it (such as Regedit is in Windows folder called regedit.exe
Click on the Conditions tab, in the Power section...uncheck the box for "Start the task only if the computer is on AC power"
Click on OK, then OK again
Close the Task Scheduler
Right click on the desktop and choose New, Shortcut
In the Location box type: schtasks /run /tn Regedit
(or whatever you called it). There is a space between s and /, between n and /, and again before the task name
Click on Next
Give your new shortcut a name
Right click on the new shortcut and choose Properties. Change the icon and change it to run Minimized so the command dialog box won’t show up.
Apply, Ok. You’re done.
To remove this ability, just open the Task Schedule and remove the task, then delete the shortcut.
Go to Settings > Updates & Security > Advanced Option
Turn off " * Restart this device as soon as possible..."
Under the section for "Pause Updates", choose a date to delay the restarting (up to 30 days, or so)
When windows doesn't give you the logon screen when you have multiple user accounts, go to Settings > Accounts > Sign In Options
Scroll down to the Privacy section
Turn off BOTH (most likely the 2nd one is turned on.
Do this for BOTH of the user accounts.
Run netplwiz
Remove all accounts except the 2 you want and the Guest account
First you need to actually show the Administrator acct. Start with:
Right click on command prompt shortcut from the start menu and Run as Administrator
Type: net user administrator /active:yes
Then press enter
Log onto the Administrator account
Create a new profile and copy all the files you want.
Copy ALL the files from the old profile to the new one with the exception of:
Ntuser.dat
Ntuser.dat.log
Ntsuer.ini
If everything works fine, then you can delete old profile and ensure you choose the option to remove account and all settings
Now go back and hide the main Administrator account the same way as above, only type /active:no
How many times have you found that you are doing a lot of copying and pasting from one program to another. Actually I'm doing it right now. I am constantly copying between WordPerfect and Chrome. One way of working faster is to have any other programs minimized but WordPerfect and Chrome.
Click on the first program. Then press the 'windows' key + {left arrow}
Click on the second program and press the 'windows' key + {right arrow} or pick one of the previews that pop up for you to pick from
Open cmd, Run As Administrator and use the command: vivetool /enable /id:
Then add the following codes after id: pressing [enter] after each code)
1) Screen Tine: 58989177
2) Start Menu new design: 47205210
3) Taskbar new autohide: 41356296
4) Redesigned, modern Run dialog box (all of these at once) Only works when logged into your MS account:
58381341,58527096,57156807,57259990
For the times when Windows Security icon won't show in the task bar and it is not listed as an option to turn on or off. Here's the fix:
Right click on Taskbar > Task Manager > Startup (tab)
At the bottom for Windows Security notification icon, right click and changed to Enabled.
Worked for me first time.
If that doesn't work, here are a few other options to try:
1) Check CCleaner Startup items
2) Navigate to C:\Users\OWNER\AppData\Local\Microsoft\Windows\Explorer
Delete all IconCache files
Restart your computer and check if the taskbar is now displaying the icons.
If you are unable to delete the files, open command prompt RUN AS ADMINISTRATOR > Type the following:
cd /d %userprofile%\AppData\Local\Microsoft\Windows\Explorer attrib –h iconcache_*.db del iconcache_*.db start explorer
Then restart the computer
3) Open regedit RUN AS ADMINISTRATOR
Navigate to: HKEY_CLASSES_ROOT > Local Settings > Software > Microsoft > CurrentVersion > TrayNotify.
Locate IconStreams and delete it.
Restart your computer.
Navigate to HKEY_CLASSES_ROOT > Local Settings > Software > Microsoft > CurrentVersion > TrayNotify
Delete pasticonstreams
Restart your computer
When the Windows Security app won't start, here's the fix for it:
Open PowerShell and RUN AS ADMINISTRATOR
Copy the following:
Get-AppxPackage Microsoft.SecHealthUI -AllUsers | Reset-AppxPackage
Paste into the PowerShell window and press [enter]
Close the PowerShell and retry
When Windows Defender starts searching (and finds) quarantined from Defenders's history, you need to stop it. And/or, the detection list won't go away when you check the Protect History. And here's how to make it all go away and start fresh:
Navigate your way to: C:\ProgramData\Microsoft\Windows Defender\Scans\History\Service
In that folder, remove the folder called DetectionHistory and all three text documents.
Restart the computer and you'll see the folder and files have been recreated and ready to go for the next scanning.
For those notifications that Windows says are bad, but you know they're ok....Clear it from the list
Go to the folder: C:\ProgramData\Microsoft\Windows Defender\Scans\History\Service
Delete the files called History and Unknown in that directory
Restart the computer
Create a folder on an external drive where the files will be copied
Boot the dead computer using a USB Windows installation flash drive
Click on Next, then click on Repair at the bottom
Go into Troubleshoot and choose Command Prompt
Insert your backup USB drive (leave the other USB drive in)
Find the drive letter of drive you'll be using for the copying of the files by experimenting with D:, or E:, or F: (most likely it will be E:)
Once you find what your external backup drive will be...
Go to C:
Keep going to C:\Users\Name (to see what the full path of the User will be)
To copy the entire persons User folder, get back to C:\
The command to copy absolutely everthing is:
xcopy "c:\users\tracy" e:\tracy /s /e /c /h /i
If you see the AppData scrolling fast, you'll know you're getting absolutely everything.
When you insert the backup usb disk into a working computer and go to that folder, you'll see the hidden files and folders (such as the AppData folder).
To NOT show the zip files on the left side of a File Explorer, you need to delete a few keys from the registry.
Open regedit and navigate to the following keys....exporting each key to your desktop for safe keeping before you actually delete it
(so it can be restored if you screw it up):
HKLM\Software\Classes\CABFolder\CLSID
HKLM\Software\Classes\CompressedFolder\CLSID
HKLM\Software\Classes\SystemFileAssociations\.zip\CLSID
HKLM\Software\Classes\SystemFileAssociations\.cab\CLSID